Documentation (In progress)
Contents
1. Introduction
1.1. Structure
1.2. Changelog
2. Installation
2.1. Windows
2.2. Mac
3. Quickstart
3.1. Open the designer
3.2. Create a scene
3.3. Configure and save the scene
3.4. Open your NLE
3.5. Render
4. Usage
4.1. Designer
4.1.1. Registration
4.1.2. Scene creation
4.2. Video Export
4.3. Scene Test
4.3.1. Open the scene tester
4.3.2. Generic settings
4.3.3. Adding video input streams
4.3.4. Adding audio input streams
4.3.5. Reading the log message
5. Troublesooting
5.1. Plugin doesn't show up
5.2. DaVinciResolve Studio
5.2.1. Plugin doesn't show up
5.2.2. Chapters causing the export to fail
5.3. VEGAS Pro
5.3.1. Plugin doesn't show up
5.4. VEGAS Pro 23
5.4.1. Plugin doesn't show up
6. Appendix
6.1. Advanced Filtering
6.1.1. CUDA
1. Introduction
Welcome to Voukoder Pro! This is the start of the continuously growing documentation.
1.1. Structure
Voukoder Pro consists out of more than one component. This diagram shows you how these components interact with each other on Windows. On MacOS the components have different type names (i.e. dylib instead of DLL).

1.2. Changelog
You can watch the whole change log on this page.
2. Installation
Voukoder Pro 2.0 requires the FFmpeg 7.1 shared libraries to be working.
2.1. Windows
You can either use the package I provide:
- LGPL: FFmpeg.LGPL.Installer.msi
- GPL: FFmpeg.GPL.Installer.msi
(Includes additional encoders like (x264, x265, ...)
Or you can even use a custom built one. In this case please make sure you also add the installation path to your PATH environment variable. The installers above already do this for you.
1.1. Mac
You can install the required libraries using homebrew by executing this command in your terminal:
brew install ffmpeg@72.1.1. Requirements
The minimal supported OS version is currently MacOS 15 (Sequoia) or MacOS 11 (Big Sur) but which is currently untested. Both Apple Silicon and Intel Macs are supported now.
3. Quick Start
This section requires the installation and registration process to be successfully finished. Please make sure "Voukoder Pro" has been successfully installed and is working properly.
3.1. Open the Designer
"Voukoder Pro" follows a different approach than "Voukoder". Instead of filling out some dropdown boxes it requires you to configure one or more so called "scenes". A "Scene" represents the workflow from input of raw frames to the output of "Voukoder Pro" (i.e. a file or a network task). Scenes can now be much more complex (i.e. filter chains or multiple node output links) which can be still supported using the graph design.
3.2. Create a scene
If no "Untitled" scene has been created yet after opening the Designer app you can create the "simple scene" by clicking in the menu bar "Scene" > "New" > "Simple". Here you can see the most simple workflow.
3.3. Configure and save the scene
Double click on any node item on the scene to configure it. In most cases you need to do this only for the encoders and muxer. Choose whatever you like. Invalid combinations of encoders and muxers will be shown as a red box in the muxer node.
Once you have configured your scene, save it under a name you can remember and reflects the settings you have made.
3.4. Open your NLE
Next you need to open your NLE (i.e. DaVinci Resolve Studio, Adobe Premiere CC, etc). As soon as you have opened your NLE and you have a project loaded you should be able to select "Voukoder Pro" as output format and select that scene you have previously configured and saved (VEGAS Pro requires to open any modify a template first). All non-NLE relevant settings are associated to that scene. All scenes can also be shared in all supported NLEs.
3.5. Render
You can now render your video using the normal functionality in your NLE.
4. Usage
4.1. Designer
The core element is the Designer. Here you have full control over all non-NLE related settings. You can also register your copy of Voukoder Pro here.
4.1.1. Registration
You can reach the license registration dialog via the top menu bar of the Designer App. The location of this menu depends on the operating system of your machine. On Windows this is located at the top of the Designer window, on a Mac it's at the top of the screen when the Designer Window is active.
Just click on the "Help" > "Register ..." entry and this window should open:
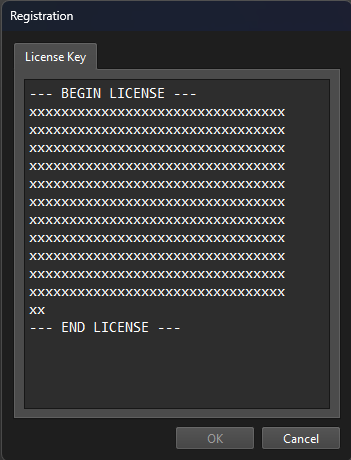
Copy & paste the license key here and click on the "OK" button. Your copy of "Voukoder Pro" is registered now.
4.1.2. Scene creation
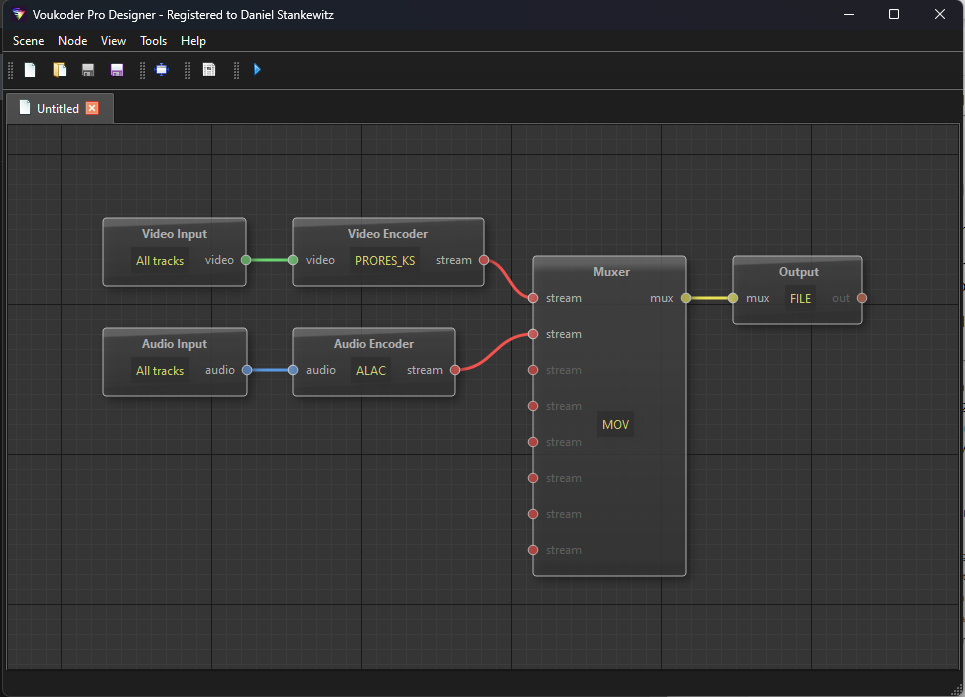
Here you can see the future encoding process. Video and audio signals run from "input" to "output" through the various stages of the chain, or graph. The representation of the graphs can be extremely extended. This is the simplest variant.
You can modify the various stages with a double-click:
- Input: In most cases, no modification is necessary. The tracks to which the NLE is to react can be assigned here, or color values can be set.
If you are sending multiple audio tracks from your NLE (currently only possible with DaVinci Resolve Studio) you can define here on which of the NLE tracks that input node should react. That means, more than one input node might be necessary.
- Encoder: In this case, these are “Prores” and “Alac”. However, they can also be changed to a more end customer-relevant format with “x264” and “aac”, for example.
- Multiplexer / Muxer: Here you have the option of setting the container or file extension that should ultimately appear for the user. Examples here are “MOV”, “MKV” or “MP4”
- Output: “File” is selected here. What is new is that many other options are available and can even be used in parallel.The file name is taken from Adobe Premiere.
- Post Processing: You can run external scripts here that will be executed and perform user defined task once an export has finished.
After any editing and display settings, save this “scene”. To do this, click on "Scene" > "Save as ..." or "Save" and give it a suitable name under which you will recognize the scene.
4.2. Video Export
Now start your NLE, load a video and switch directly to the export / delivery view:
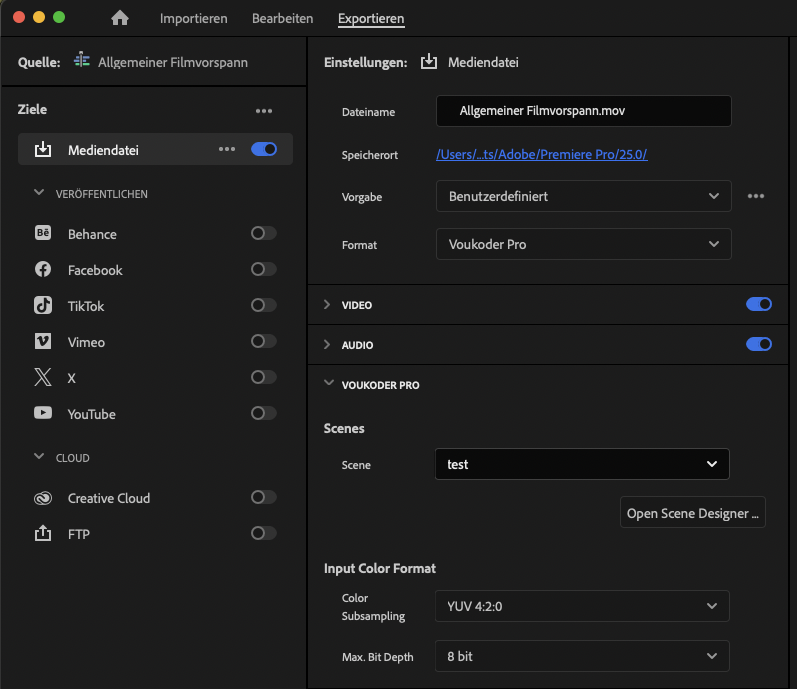

“Voukoder Pro” should now be selectable under ‘Format’, and so should the ‘Scene’ you created earlier. You can also edit the scene directly from here. To do this, click on “Open Scene Designer ...”. Both ways of using the Designer are possible.
Now you can either transfer the video to the batch encoder or export it directly.
4.3. Scene Test
A "scene test" gives you the possibility to test your currently open scene within the Designer app but with the real Voukoder Pro exporting engine. You can even watch the full logfile while it's working.
4.3.1. Open the scene tester
Select Tools > Perform Test ... from the top menu bar or click on the Play icon in the toolbar and the Scene Test window should appear.
Here you have the possibility to run a simulation of an export to test if all your settings in Voukoder Pro are working. You'll also get a log file that helps the developer to assist you if something is not working as expected.
4.3.2. Generic settings
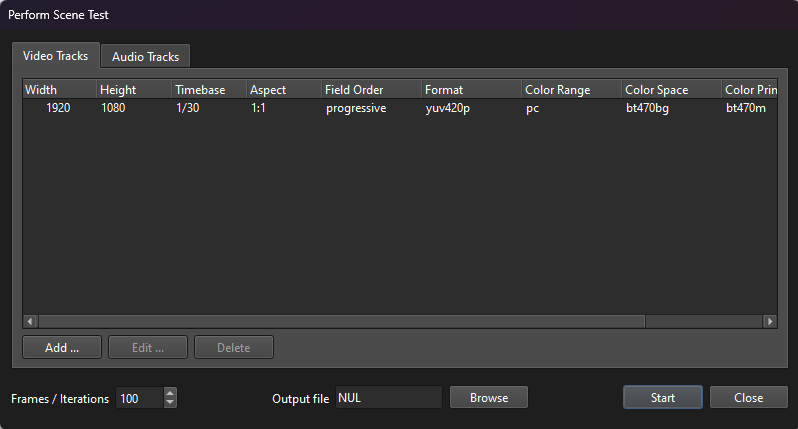
In this window you have the possibility to adjust some settings for the simulation:
- Video Tracks
Click on Add ... to add a new video track. You can also Edit ... it again to make changes or Delete the marked track again if you don't need it anymore.
(For details see section 4.3.3) - Audio Tracks
Click on Add ... to add a new audio track. You can also Edit ... it again to make changes or Delete the marked track again if you don't need it anymore.
(For details see section 4.3.4) - Frames / Iterations
You can adjust this value to define how many frames or iterations the test should loop through. - Output File Name
The default is set to NUL (Windows) or /dev/null (MacOS, Linux). If you specify a valid filename it will store the generated test file on your file system, so you can play or inspect it.
4.3.3. Adding video input streams
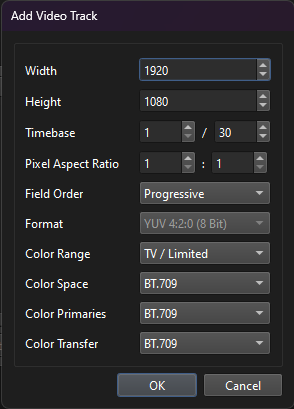
Normally you can just click OK using the default settings, but you can also adjust the various video frame settings in this window:
- Width
- Height
- Timebase
A time base is the opposite value of the frame rate and defines the temporal distance between frames. 1/30 means 30 fps and 1001/60 means 59.94 fps. - Pixel Aspect Ratio
The pixel aspect ration for modern systems is mostly 1:1. But you can define a different aspect here. - Field Order
Mostly this is Progressive, but for some encoders you can also define an interlaced format like Bottom Frame First or Top Frame First. - Format
The pixel format of the generated frame data. Currently this is yuv420p only. But it will be automatically up- or down converted if a different format is required. But the data will remain the same. (i.e. The visual data remains like 8 bit even it it gets upconverted to 10 bit) - Color Range
The color range the frame data gets interpreted as. This can be either TV / Limited (means values from 16 to 235 in 8 bit) or PC / Full (means values from 0 to 255 in 8 bit). Most encoders prefer TV / Limited when work with YUV data and PC / Full with RGB data. - Color Space
- Color Primaries
- Color Transfer
4.3.4. Adding audio input streams
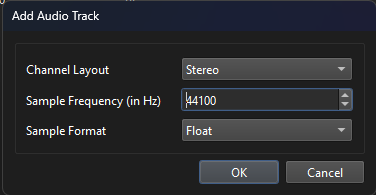
Here you can adjust the audio frame settings:
- Channel Layout
Here you can freely define the layout of the channels. i.e. you could add multiple mono channels or one 5.1 layout. - Sample Frequency
You can define the sample frequency here. Normally this is 44100 Hz or 48000 Hz. - Sample Format
This is how the uncompressed data is stored in (i.e. Float means (basically) floating point values between 0 and 1, 16 Bit Integer means integer values between -32767 and +32767). Normally 32 Bit Float has a better precision.
4.3.5. Reading the log messages
After clicking on the Start button a new window appears containing the log messages from Voukoder Pro. The real Voukoder Pro engine is used here, just the input data is fake (as defined in the earlier steps).
Successful Export
A successful log file of the "Simple Scene" with 10 iterations could look like this:
2025-02-08 09:11:36 (info)	### PHASE: PRE-INIT
2025-02-08 09:11:36 (debug)	Filter config: abuffer@89f762fcedfb40f8be24da7ba1c7575f=sample_rate=44100:sample_fmt=flt:channel_layout=stereo,aformat=sample_fmts=s32p,abuffersink@2067616dc9a44f1a9a6087c61cc4091a
2025-02-08 09:11:36 (info)	### PHASE: INIT
2025-02-08 09:11:36 (trace)	Setting 'sample_rate' to value '44100'
2025-02-08 09:11:36 (trace)	Setting 'sample_fmt' to value 'flt'
2025-02-08 09:11:36 (trace)	Setting 'channel_layout' to value 'stereo'
2025-02-08 09:11:36 (trace)	Setting 'sample_fmts' to value 's32p'
2025-02-08 09:11:36 (trace)	tb:1/44100 samplefmt:flt samplerate:44100 chlayout:stereo
2025-02-08 09:11:36 (trace)	auto-inserting filter 'auto_aresample_0' between the filter 'abuffer@89f762fcedfb40f8be24da7ba1c7575f' and the filter 'Parsed_aformat_1'
2025-02-08 09:11:36 (trace)	query_formats: 3 queried, 2 merged, 5 already done, 0 delayed
2025-02-08 09:11:36 (trace)	Using fltp internally between filters
2025-02-08 09:11:36 (trace)	ch:2 chl:stereo fmt:flt r:44100Hz -> ch:2 chl:stereo fmt:s32p r:44100Hz
2025-02-08 09:11:36 (debug)	Dumping filter graphfor NLE Track #1:
+------------------------------------------+
| abuffer@89f762fcedfb40f8be24da7ba1c7575f |default--[44100Hz flt:stereo]--auto_aresample_0:default
|                (abuffer)                 |
+------------------------------------------+
                                                        +------------------+
auto_aresample_0:default--[44100Hz s32p:stereo]--default| Parsed_aformat_1 |default--[44100Hz s32p:stereo]--abuffersink@2067616dc9a44f1a9a6087c61cc4091a:default
                                                        |    (aformat)     |
                                                        +------------------+
                                                        +----------------------------------------------+
Parsed_aformat_1:default--[44100Hz s32p:stereo]--default| abuffersink@2067616dc9a44f1a9a6087c61cc4091a |
                                                        |                (abuffersink)                 |
                                                        +----------------------------------------------+
                                                                               +------------------+
abuffer@89f762fcedfb40f8be24da7ba1c7575f:default--[44100Hz flt:stereo]--default| auto_aresample_0 |default--[44100Hz s32p:stereo]--Parsed_aformat_1:default
                                                                               |   (aresample)    |
                                                                               +------------------+
2025-02-08 09:11:36 (info)	Initializing audio encoder: alac
2025-02-08 09:11:36 (info)	Successfully initialized the output format.
2025-02-08 09:11:36 (info)	### PHASE: PRE-INIT
2025-02-08 09:11:36 (debug)	Filter config: buffer@f5bea718570e40faaaef8a09b0a51974=width=1920:height=1080:pix_fmt=yuv420p:time_base=1/30:pixel_aspect=1/1,format=pix_fmts=yuv422p10le,buffersink@21cf7397ff164ba58c01434515a5fe00
2025-02-08 09:11:36 (info)	### PHASE: INIT
2025-02-08 09:11:36 (trace)	Setting 'width' to value '1920'
2025-02-08 09:11:36 (trace)	Setting 'height' to value '1080'
2025-02-08 09:11:36 (trace)	Setting 'pix_fmt' to value 'yuv420p'
2025-02-08 09:11:36 (trace)	Setting 'time_base' to value '1/30'
2025-02-08 09:11:36 (trace)	Setting 'pixel_aspect' to value '1/1'
2025-02-08 09:11:36 (trace)	Setting 'pix_fmts' to value 'yuv422p10le'
2025-02-08 09:11:36 (trace)	w:1920 h:1080 pixfmt:yuv420p tb:1/30 fr:0/1 sar:1/1 csp:unknown range:unknown
2025-02-08 09:11:36 (trace)	w:iw h:ih flags:'' interl:0
2025-02-08 09:11:36 (trace)	auto-inserting filter 'auto_scale_0' between the filter 'buffer@f5bea718570e40faaaef8a09b0a51974' and the filter 'Parsed_format_1'
2025-02-08 09:11:36 (trace)	query_formats: 3 queried, 3 merged, 3 already done, 0 delayed
2025-02-08 09:11:36 (trace)	w:1920 h:1080 fmt:yuv420p csp:unknown range:unknown sar:1/1 -> w:1920 h:1080 fmt:yuv422p10le csp:unknown range:unknown sar:1/1 flags:0x00000004
2025-02-08 09:11:36 (trace)	Selected 1/30 time base
2025-02-08 09:11:36 (trace)	Sync level 1
2025-02-08 09:11:36 (debug)	Dumping filter graphfor NLE Track #0:
+-----------------------------------------+
| buffer@f5bea718570e40faaaef8a09b0a51974 |default--[1920x1080 1:1 yuv420p]--auto_scale_0:default
|                (buffer)                 |
+-----------------------------------------+
                                                          +-----------------+
auto_scale_0:default--[1920x1080 1:1 yuv422p10le]--default| Parsed_format_1 |default--[1920x1080 1:1 yuv422p10le]--buffersink@21cf7397ff164ba58c01434515a5fe00:default
                                                          |    (format)     |
                                                          +-----------------+
                                                             +---------------------------------------------+
Parsed_format_1:default--[1920x1080 1:1 yuv422p10le]--default| buffersink@21cf7397ff164ba58c01434515a5fe00 |
                                                             |                (buffersink)                 |
                                                             +---------------------------------------------+
                                                                                 +--------------+
buffer@f5bea718570e40faaaef8a09b0a51974:default--[1920x1080 1:1 yuv420p]--default| auto_scale_0 |default--[1920x1080 1:1 yuv422p10le]--Parsed_format_1:default
                                                                                 |   (scale)    |
                                                                                 +--------------+
2025-02-08 09:11:36 (info)	Initializing video encoder: prores_ks
2025-02-08 09:11:36 (info)	Initialization succeeded.
2025-02-08 09:11:36 (info)	### PHASE: PRE-OPEN
2025-02-08 09:11:36 (info)	Registering 1 audio stream(s)
2025-02-08 09:11:36 (debug)	Registered stream 2067616d-c9a4-4f1a-9a60-87c61cc4091a:0
2025-02-08 09:11:36 (info)	Registering 1 video stream(s)
2025-02-08 09:11:36 (debug)	Registered stream 21cf7397-ff16-4ba5-8c01-434515a5fe00:1
2025-02-08 09:11:36 (info)	Pre-open phase succeeded.
2025-02-08 09:11:36 (info)	### PHASE: OPEN
2025-02-08 09:11:36 (info)	Opening audio encoder plugin 'alac' with params 'null'
2025-02-08 09:11:36 (trace)	encoding as 24 bits-per-sample
2025-02-08 09:11:36 (info)	Opening video encoder plugin 'prores_ks' with params 'null'
2025-02-08 09:11:36 (trace)	Autoselected HQ profile to keep best quality. It can be overridden through -profile option.
2025-02-08 09:11:36 (trace)	profile 3, 1020 slices, interlacing: no, 950 bits per MB
2025-02-08 09:11:36 (trace)	frame size upper bound: 978318
2025-02-08 09:11:36 (trace)	Autoselected HQ profile to keep best quality. It can be overridden through -profile option.
2025-02-08 09:11:36 (trace)	profile 3, 1020 slices, interlacing: no, 950 bits per MB
2025-02-08 09:11:36 (trace)	frame size upper bound: 978318
2025-02-08 09:11:36 (trace)	Autoselected HQ profile to keep best quality. It can be overridden through -profile option.
2025-02-08 09:11:36 (trace)	profile 3, 1020 slices, interlacing: no, 950 bits per MB
2025-02-08 09:11:36 (trace)	frame size upper bound: 978318
2025-02-08 09:11:36 (trace)	Autoselected HQ profile to keep best quality. It can be overridden through -profile option.
2025-02-08 09:11:36 (trace)	profile 3, 1020 slices, interlacing: no, 950 bits per MB
2025-02-08 09:11:36 (trace)	frame size upper bound: 978318
2025-02-08 09:11:36 (trace)	Autoselected HQ profile to keep best quality. It can be overridden through -profile option.
2025-02-08 09:11:36 (trace)	profile 3, 1020 slices, interlacing: no, 950 bits per MB
2025-02-08 09:11:36 (trace)	frame size upper bound: 978318
2025-02-08 09:11:36 (trace)	Autoselected HQ profile to keep best quality. It can be overridden through -profile option.
2025-02-08 09:11:36 (trace)	profile 3, 1020 slices, interlacing: no, 950 bits per MB
2025-02-08 09:11:36 (trace)	frame size upper bound: 978318
2025-02-08 09:11:36 (trace)	Autoselected HQ profile to keep best quality. It can be overridden through -profile option.
2025-02-08 09:11:36 (trace)	profile 3, 1020 slices, interlacing: no, 950 bits per MB
2025-02-08 09:11:36 (trace)	frame size upper bound: 978318
2025-02-08 09:11:36 (trace)	Autoselected HQ profile to keep best quality. It can be overridden through -profile option.
2025-02-08 09:11:36 (trace)	profile 3, 1020 slices, interlacing: no, 950 bits per MB
2025-02-08 09:11:36 (trace)	frame size upper bound: 978318
2025-02-08 09:11:36 (trace)	Autoselected HQ profile to keep best quality. It can be overridden through -profile option.
2025-02-08 09:11:36 (trace)	profile 3, 1020 slices, interlacing: no, 950 bits per MB
2025-02-08 09:11:36 (trace)	frame size upper bound: 978318
2025-02-08 09:11:36 (trace)	Autoselected HQ profile to keep best quality. It can be overridden through -profile option.
2025-02-08 09:11:36 (trace)	profile 3, 1020 slices, interlacing: no, 950 bits per MB
2025-02-08 09:11:36 (trace)	frame size upper bound: 978318
2025-02-08 09:11:36 (trace)	Autoselected HQ profile to keep best quality. It can be overridden through -profile option.
2025-02-08 09:11:36 (trace)	profile 3, 1020 slices, interlacing: no, 950 bits per MB
2025-02-08 09:11:36 (trace)	frame size upper bound: 978318
2025-02-08 09:11:36 (trace)	Autoselected HQ profile to keep best quality. It can be overridden through -profile option.
2025-02-08 09:11:36 (trace)	profile 3, 1020 slices, interlacing: no, 950 bits per MB
2025-02-08 09:11:36 (trace)	frame size upper bound: 978318
2025-02-08 09:11:36 (trace)	Autoselected HQ profile to keep best quality. It can be overridden through -profile option.
2025-02-08 09:11:36 (trace)	profile 3, 1020 slices, interlacing: no, 950 bits per MB
2025-02-08 09:11:36 (trace)	frame size upper bound: 978318
2025-02-08 09:11:36 (trace)	Autoselected HQ profile to keep best quality. It can be overridden through -profile option.
2025-02-08 09:11:36 (trace)	profile 3, 1020 slices, interlacing: no, 950 bits per MB
2025-02-08 09:11:36 (trace)	frame size upper bound: 978318
2025-02-08 09:11:36 (trace)	Autoselected HQ profile to keep best quality. It can be overridden through -profile option.
2025-02-08 09:11:36 (trace)	profile 3, 1020 slices, interlacing: no, 950 bits per MB
2025-02-08 09:11:36 (trace)	frame size upper bound: 978318
2025-02-08 09:11:36 (trace)	Autoselected HQ profile to keep best quality. It can be overridden through -profile option.
2025-02-08 09:11:36 (trace)	profile 3, 1020 slices, interlacing: no, 950 bits per MB
2025-02-08 09:11:36 (trace)	frame size upper bound: 978318
2025-02-08 09:11:36 (trace)	Autoselected HQ profile to keep best quality. It can be overridden through -profile option.
2025-02-08 09:11:36 (trace)	profile 3, 1020 slices, interlacing: no, 950 bits per MB
2025-02-08 09:11:36 (trace)	frame size upper bound: 978318
2025-02-08 09:11:36 (trace)	Autoselected HQ profile to keep best quality. It can be overridden through -profile option.
2025-02-08 09:11:36 (trace)	profile 3, 1020 slices, interlacing: no, 950 bits per MB
2025-02-08 09:11:36 (trace)	frame size upper bound: 978318
2025-02-08 09:11:36 (trace)	Autoselected HQ profile to keep best quality. It can be overridden through -profile option.
2025-02-08 09:11:36 (trace)	profile 3, 1020 slices, interlacing: no, 950 bits per MB
2025-02-08 09:11:36 (trace)	frame size upper bound: 978318
2025-02-08 09:11:36 (trace)	Autoselected HQ profile to keep best quality. It can be overridden through -profile option.
2025-02-08 09:11:36 (trace)	profile 3, 1020 slices, interlacing: no, 950 bits per MB
2025-02-08 09:11:36 (trace)	frame size upper bound: 978318
2025-02-08 09:11:36 (trace)	Autoselected HQ profile to keep best quality. It can be overridden through -profile option.
2025-02-08 09:11:36 (trace)	profile 3, 1020 slices, interlacing: no, 950 bits per MB
2025-02-08 09:11:36 (trace)	frame size upper bound: 978318
2025-02-08 09:11:36 (trace)	Autoselected HQ profile to keep best quality. It can be overridden through -profile option.
2025-02-08 09:11:36 (trace)	profile 3, 1020 slices, interlacing: no, 950 bits per MB
2025-02-08 09:11:36 (trace)	frame size upper bound: 978318
2025-02-08 09:11:36 (trace)	Autoselected HQ profile to keep best quality. It can be overridden through -profile option.
2025-02-08 09:11:36 (trace)	profile 3, 1020 slices, interlacing: no, 950 bits per MB
2025-02-08 09:11:36 (trace)	frame size upper bound: 978318
2025-02-08 09:11:36 (trace)	Autoselected HQ profile to keep best quality. It can be overridden through -profile option.
2025-02-08 09:11:36 (trace)	profile 3, 1020 slices, interlacing: no, 950 bits per MB
2025-02-08 09:11:36 (trace)	frame size upper bound: 978318
2025-02-08 09:11:36 (trace)	Autoselected HQ profile to keep best quality. It can be overridden through -profile option.
2025-02-08 09:11:36 (trace)	profile 3, 1020 slices, interlacing: no, 950 bits per MB
2025-02-08 09:11:36 (trace)	frame size upper bound: 978318
2025-02-08 09:11:36 (trace)	Autoselected HQ profile to keep best quality. It can be overridden through -profile option.
2025-02-08 09:11:36 (trace)	profile 3, 1020 slices, interlacing: no, 950 bits per MB
2025-02-08 09:11:36 (trace)	frame size upper bound: 978318
2025-02-08 09:11:36 (trace)	Autoselected HQ profile to keep best quality. It can be overridden through -profile option.
2025-02-08 09:11:36 (trace)	profile 3, 1020 slices, interlacing: no, 950 bits per MB
2025-02-08 09:11:36 (trace)	frame size upper bound: 978318
2025-02-08 09:11:36 (trace)	Autoselected HQ profile to keep best quality. It can be overridden through -profile option.
2025-02-08 09:11:36 (trace)	profile 3, 1020 slices, interlacing: no, 950 bits per MB
2025-02-08 09:11:36 (trace)	frame size upper bound: 978318
2025-02-08 09:11:36 (trace)	Autoselected HQ profile to keep best quality. It can be overridden through -profile option.
2025-02-08 09:11:36 (trace)	profile 3, 1020 slices, interlacing: no, 950 bits per MB
2025-02-08 09:11:36 (trace)	frame size upper bound: 978318
2025-02-08 09:11:36 (trace)	Autoselected HQ profile to keep best quality. It can be overridden through -profile option.
2025-02-08 09:11:36 (trace)	profile 3, 1020 slices, interlacing: no, 950 bits per MB
2025-02-08 09:11:36 (trace)	frame size upper bound: 978318
2025-02-08 09:11:36 (trace)	Autoselected HQ profile to keep best quality. It can be overridden through -profile option.
2025-02-08 09:11:36 (trace)	profile 3, 1020 slices, interlacing: no, 950 bits per MB
2025-02-08 09:11:36 (trace)	frame size upper bound: 978318
2025-02-08 09:11:36 (trace)	Autoselected HQ profile to keep best quality. It can be overridden through -profile option.
2025-02-08 09:11:36 (trace)	profile 3, 1020 slices, interlacing: no, 950 bits per MB
2025-02-08 09:11:36 (trace)	frame size upper bound: 978318
2025-02-08 09:11:36 (trace)	Autoselected HQ profile to keep best quality. It can be overridden through -profile option.
2025-02-08 09:11:36 (trace)	profile 3, 1020 slices, interlacing: no, 950 bits per MB
2025-02-08 09:11:36 (trace)	frame size upper bound: 978318
2025-02-08 09:11:36 (trace)	Setting default whitelist 'file,crypto,data'
2025-02-08 09:11:36 (trace)	Output #0, mov, to 'NUL':
2025-02-08 09:11:36 (trace)	  Metadata:
2025-02-08 09:11:36 (trace)	    encoding_tool   :
2025-02-08 09:11:36 (trace)	Voukoder Pro 2.0.6
2025-02-08 09:11:36 (trace)
2025-02-08 09:11:36 (trace)	  Stream #0
2025-02-08 09:11:36 (trace)	:0
2025-02-08 09:11:36 (trace)	, 0, 1/44100
2025-02-08 09:11:36 (trace)	: Audio: alac, 44100 Hz, stereo, s32p (24 bit), 128 kb/s
2025-02-08 09:11:36 (trace)
2025-02-08 09:11:36 (trace)	  Stream #0
2025-02-08 09:11:36 (trace)	:1
2025-02-08 09:11:36 (trace)	, 0, 1/30
2025-02-08 09:11:36 (trace)	: Video: prores (HQ), 1 reference frame (apch / 0x68637061), yuv422p10le(pc, bt470bg/bt470m/bt470m, progressive), 1920x1080 [SAR 1:1 DAR 16:9], 0/1, q=2-31, 200 kb/s
2025-02-08 09:11:36 (trace)	,
2025-02-08 09:11:36 (trace)	30 fps,
2025-02-08 09:11:36 (trace)	30 tbn
2025-02-08 09:11:36 (trace)
2025-02-08 09:11:36 (info)	Successfully opened the output format.
2025-02-08 09:11:36 (info)	Open phase succeeded.
2025-02-08 09:11:36 (info)	Waiting for frames ...
2025-02-08 09:11:36 (trace)	Changing video frame properties on the fly is not supported by all filters.
2025-02-08 09:11:36 (trace)	filter context - w: 1920 h: 1080 fmt: 0 csp: unknown range: unknown, incoming frame - w: 1920 h: 1080 fmt: 0 csp: bt470bg range: pc pts_time: 0
2025-02-08 09:11:36 (trace)	w:1920 h:1080 fmt:yuv420p csp:unknown range:unknown sar:1/1 -> w:1920 h:1080 fmt:yuv422p10le csp:unknown range:unknown sar:1/1 flags:0x00000004
2025-02-08 09:11:36 (trace)	Sync level 1
2025-02-08 09:11:36 (trace)	w:1920 h:1080 fmt:yuv420p csp:unknown range:unknown sar:1/1 -> w:1920 h:1080 fmt:yuv422p10le csp:unknown range:unknown sar:1/1 flags:0x00000004
2025-02-08 09:11:36 (trace)	Sync level 1
2025-02-08 09:11:36 (trace)	w:1920 h:1080 fmt:yuv420p csp:bt470bg range:pc sar:1/1 -> w:1920 h:1080 fmt:yuv422p10le csp:unknown range:unknown sar:1/1 flags:0x00000004
2025-02-08 09:11:36 (trace)	Sync level 1
2025-02-08 09:11:36 (trace)	Changing video frame properties on the fly is not supported by all filters.
2025-02-08 09:11:36 (trace)	filter context - w: 1920 h: 1080 fmt: 0 csp: unknown range: unknown, incoming frame - w: 1920 h: 1080 fmt: 0 csp: bt470bg range: pc pts_time: 0.0333333
2025-02-08 09:11:36 (trace)	Changing video frame properties on the fly is not supported by all filters.
2025-02-08 09:11:36 (trace)	filter context - w: 1920 h: 1080 fmt: 0 csp: unknown range: unknown, incoming frame - w: 1920 h: 1080 fmt: 0 csp: bt470bg range: pc pts_time: 0.0666667
2025-02-08 09:11:36 (trace)	Changing video frame properties on the fly is not supported by all filters.
2025-02-08 09:11:36 (trace)	filter context - w: 1920 h: 1080 fmt: 0 csp: unknown range: unknown, incoming frame - w: 1920 h: 1080 fmt: 0 csp: bt470bg range: pc pts_time: 0.1
2025-02-08 09:11:36 (trace)	Changing video frame properties on the fly is not supported by all filters.
2025-02-08 09:11:36 (trace)	filter context - w: 1920 h: 1080 fmt: 0 csp: unknown range: unknown, incoming frame - w: 1920 h: 1080 fmt: 0 csp: bt470bg range: pc pts_time: 0.133333
2025-02-08 09:11:36 (trace)	Changing video frame properties on the fly is not supported by all filters.
2025-02-08 09:11:36 (trace)	filter context - w: 1920 h: 1080 fmt: 0 csp: unknown range: unknown, incoming frame - w: 1920 h: 1080 fmt: 0 csp: bt470bg range: pc pts_time: 0.166667
2025-02-08 09:11:36 (trace)	Changing video frame properties on the fly is not supported by all filters.
2025-02-08 09:11:36 (trace)	filter context - w: 1920 h: 1080 fmt: 0 csp: unknown range: unknown, incoming frame - w: 1920 h: 1080 fmt: 0 csp: bt470bg range: pc pts_time: 0.2
2025-02-08 09:11:36 (trace)	Changing video frame properties on the fly is not supported by all filters.
2025-02-08 09:11:36 (trace)	filter context - w: 1920 h: 1080 fmt: 0 csp: unknown range: unknown, incoming frame - w: 1920 h: 1080 fmt: 0 csp: bt470bg range: pc pts_time: 0.233333
2025-02-08 09:11:36 (trace)	Changing video frame properties on the fly is not supported by all filters.
2025-02-08 09:11:36 (trace)	filter context - w: 1920 h: 1080 fmt: 0 csp: unknown range: unknown, incoming frame - w: 1920 h: 1080 fmt: 0 csp: bt470bg range: pc pts_time: 0.266667
2025-02-08 09:11:36 (trace)	Changing video frame properties on the fly is not supported by all filters.
2025-02-08 09:11:36 (trace)	filter context - w: 1920 h: 1080 fmt: 0 csp: unknown range: unknown, incoming frame - w: 1920 h: 1080 fmt: 0 csp: bt470bg range: pc pts_time: 0.3
2025-02-08 09:11:36 (info)	Executing pre-close phase ...
2025-02-08 09:11:36 (info)	Flushing audio encoders ...
2025-02-08 09:11:36 (info)	Flushing video encoders ...
2025-02-08 09:11:36 (debug)	Muxing packet with pts 0
2025-02-08 09:11:36 (debug)	Muxing packet with pts 1
2025-02-08 09:11:36 (debug)	Muxing packet with pts 2
2025-02-08 09:11:36 (debug)	Muxing packet with pts 3
2025-02-08 09:11:36 (debug)	Muxing packet with pts 4
2025-02-08 09:11:36 (debug)	Muxing packet with pts 5
2025-02-08 09:11:36 (debug)	Muxing packet with pts 6
2025-02-08 09:11:36 (debug)	Muxing packet with pts 7
2025-02-08 09:11:36 (debug)	Muxing packet with pts 8
2025-02-08 09:11:36 (debug)	Muxing packet with pts 9
2025-02-08 09:11:36 (info)	Pre-close phase succeeded.
2025-02-08 09:11:36 (info)	Executing close phase ...
2025-02-08 09:11:36 (info)	Closing audio encoders ...
2025-02-08 09:11:36 (info)	Closing audio encoder 'alac'
2025-02-08 09:11:36 (info)	Closing video encoders ...
2025-02-08 09:11:36 (info)	Closing video encoder 'prores_ks'
2025-02-08 09:11:36 (trace)	Statistics: 6162600 bytes written, 2 seeks, 27 writeouts
2025-02-08 09:11:36 (info)	Successfully closed output.
2025-02-08 09:11:36 (info)	Close phase succeeded.
----
Exported 10 frames in 1.3435 seconds.
This is a theoretical average export speed of 7.44327 fps.
IMPORTANT! Real exports using an NLE might be slower due to the NLE overhead.Explanation
Export failure
tbd5. Troubleshooting
5.1. Plugin doesn't show up
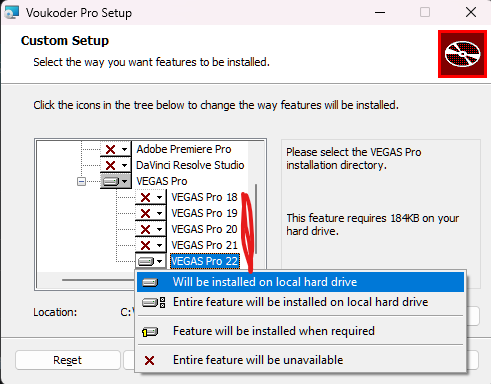
Please check on this page of the installer if you did install the plugin for NLE. It will only show up if it has been manually selected.
5.2. DaVinci Resolve Studio
tbd
5.2.1. Plugin doesn't show up
Are you using the studio (paid) version or the non-studio (free) version?
The free version doesn't support external plugins. Thus Voukoder Pro works with the paid DaVinci Resolve Studio version only.
Did you select to install the DVRS plugin in the installer?
You need to do this and check for the right install directory. Otherwise the plugin does not get installed.
5.2.2. Chapters causing the export to fail
Chapters are currently not supported with Matroska (MKV) containers. Please use MOV or MKV instead.
5.3. VEGAS Pro
5.3.1. Plugin doesn't show up
"Voukoder Pro" doesn't show up in VEGAS' "Render as" / export-dialog window.
Did you select the correct VEGAS plugin in the Voukoder Pro installer?
You need to select the plugins you want to use in the Voukoder Pro installer. Voukoder Pro is also not able to autodetect the installation path of VEGAS Pro. Make sure the installation path of the plugin is valid for your VEGAS Pro version.
Default: C:\Program Files\VEGAS\VEGAS Pro 22.0 (Depending on your version of VEGAS Pro)
Is voukoderproplug-vegas??.dll shown in the components tab?
Go to Help > About ... and click on the Components tab. You'll see a list of currently loaded (internal and external) VEGAS Pro plugins. One of it should look similar to this entry:
 voukoderproplug-vegas22.dll
     version: 0.1.0.0
     path: C:\Program Files\VEGAS\VEGAS Pro 22.0\FileIO Plug-Ins\voukoderproplug\voukoderproplug-vegas22.dll
If it is not present make sure the installation path is correct.
It is still not shown. Help!
This case should not happen anymore. This has actually been fixed from VoukoderPro-2_VEGAS_Pro_23-v4.zip on and from Voukoder Pro 2026 on.
5.3. VEGAS Pro 23
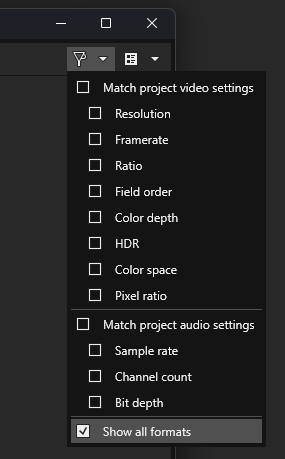
5.3.1 I don't see "Voukoder Pro" in the "Render" dialog
Check the "Show all formats" checkbox in the "Render" dialog. The plugin should be visible then.
6. Addendum
tbd
6.1. Advanced Filtering
tbd
6.1.1. CUDA
tbd